
A few months ago, we wrote a blog giving a few tips and tricks on creating the perfect nursery for you and your child!
Today on the blog, learn some helpful hints on how to create the perfect space for your older, more opinionated child!
Ultimately, designing kid’s spaces is just like designing any other space, but with a license to have more fun. The freedom to use bright colors and playful elements make this such a unique experience, so don’t be afraid to have fun throughout the process!
Tip 1
THEIR ROOM, THEIR CHOICE

Involve your child! While the design of your kid’s room will ultimately be up to you, it is really important to ask your child what they want. Unlike babies, older children have opinions, likes, and dislikes. Ask them about what those are, and make sure they feel listened to. You want their room to be a space they love; a little retreat for them. Lead designer Stephanie recommends meeting with the parents and child together for the interview process, taking notes on what both parties desire for the room. Obviously, you won’t be able to give your child everything they want, but the goal of this step is to understand what they want and how you can realistically incorporate that.
Tip 2
START WITH COLOR

One of the most helpful things Stephanie has learned over the years is starting the design process by asking the child what color they want their room to be. Kids often don’t care much about patterns and textures, what they really love are bright colors! Ask your child what color they want their room to be, once you have this information you can move on to the necessary step of compromise.
Tip 3
COMPROMISE FOR TIMELESSNESS

As previously mentioned, kids love bright colors, so if the child had it their way, the walls and ceiling of their room would be painted a vibrant, juvenile pink or blue. We love vibrant pinks and blues, but they need to be incorporated tastefully. So the next step is taking the color your child wants and toning it down.
Maybe your daughter wants a bright pink room, but in a few years, it’s likely that she will have grown tired of the vibrant color (as older kids likes and dislikes change frequently). Instead of painting her room a bright pink, give her options for light pinks and blushes that can be joined by the bright pink through accents. These neutral options of the bright pink she wants are still “pink” but are timeless and will serve as an adaptive foundation for future designs.


Tip 4
INJECT REMOVABLE COLOR

Now add the playful and vibrant colors your child really wants in the space. Bedding is an easy way to add fun patterns and bright colors, and it can easily be changed in the future to create a completely different feel. Along with the bedding, add pops of color and fun patterns through artwork, accent pillows, and other accessories.
Or add an unexpected twist to a timeless element. For example, in one project we used a classic five armed chandelier as the main light fixture. To add some fun, we used hot pink lampshades on the candelabras. These playful lampshades added the color our client’s daughter wanted but can also be easily switched out in the future. Adding vibrant colors this way results in a fun and youthful space that isn’t permanent.

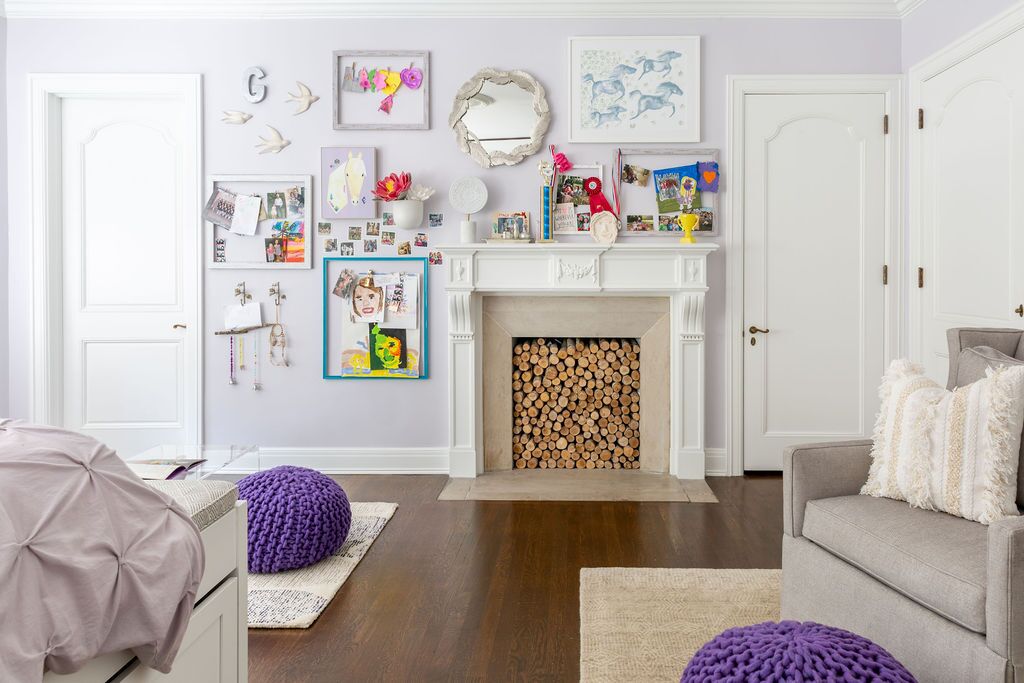
Just make sure you pair these daring color combos and playful patterns with more neutral tones, to create a balance between whimsical and sophisticated! In this pink room, we created this balance by mixing the hot pink accents with gray and gold accents.
Tip 5
CREATE A FOCAL POINT
You now want to create a focal point. As discussed in our blog covering nursery design, we like to do this by creating a statement wall. Timeless wallpapers, large headboards, or even wood paneling can be great statement wall options.

However, in one of Stephanie’s designs, her focal point was actually an A-frame bed. When asked what she wanted in her room, the client’s daughter said she wanted a treehouse. We certainly couldn’t give her an actual treehouse, so instead, we gave her a bed that felt like one. Even better is this bed’s ability to be transformed into a four-poster bed in the future!

Tip 6
USE PRACTICAL MATERIALS

Stain-resistant and durable materials will save you from many headaches in the future. We recommend incorporating stain-resistant carpets, vinyl wallpapers and furniture with durable fabrics. All of these materials are ready for the endless wear and tear that each child brings with them, and are much easier to clean than their less durable counterparts.
Tip 7
ENJOY THE REACTION
Finally, give your child a special reveal! According to Stephanie, the best part about the whole process is watching the kid’s reaction to seeing their new room. There is nothing quite as rewarding as watching their eyes light up as they walk into the room and react with pure joy. We recommend trying to keep the room blocked off at the end of the design process and then planning a reveal day.
Your child’s room will go through numerous changes, so designing a timeless foundation that can easily be transformed is crucial. Designing a kid’s room is such a special experience, have fun and don’t be afraid to use bold colors and patterns!
To see more kid’s spaces, follow us on Instagram!